Pages

Thursday, February 20, 2014

Sausage-infused Ratatouille

As I was strolling around our local Whole Foods looking for a healthy afternoon snack yesterday, I quickly gave some thought to dinner. So far on the menu we had Brussels sprouts and sausages, and I knew that was not going to cut it. I spotted an eggplant, knowing my husband likes them, and added it to the basket, figuring I could think of specifics later.

It wasn't until I spotted a yellow onion and Roma tomatoes sitting atop my fridge that inspiration struck, and I came up with this ratatouille inspired dish.


I chopped everything up into more or less bite-sized pieces (half-inch to one inch pieces).


As I sat there chopping, thinking about the order in which to cook everything, my eyes fell on this small container of basil-infused olive oil my brother-in-law had brought back from when he was in Italy. I decided it would be the perfect thing to use for this dish.


The onion went in first, cooking for about 5 minutes. Then I added the eggplant and sausage along with some thyme, oregano, and salt. I let that cook for another 10 minutes before I added the tomatoes near the end. The Brussels sprouts had been roasting in coconut oil in the oven (my favorite method), and when they were done, I tossed it all together.


It was a flavor-filled, healthy creation perfect for a grey, soggy night here in New England.

Ingredients:
1 eggplant
1 medium yellow onion
4 Roma tomatoes
4 sausages
2 bags Brussels sprouts
4 Tbsp basil-infused olive oil, separated (use ~2 tsp basil if using regular olive oil)
3 Tbsp coconut oil
~2 tsp thyme
~2 tsp oregano
salt, to taste

Directions:
1. Spread Brussels sprouts over parchment lined sheet tray. Melt coconut oil and pour over sprouts. Put into 400 degree oven for 20 minutes. Turn sprouts around with spatula, then roast for another 20 minutes.
2. Chop up the eggplant, onion, tomatoes, and sausages into half-inch to inch thick pieces.
3. Heat a skillet over medium-high heat and add 2 Tbsp of olive oil. Add the onions and cook for about 5 minutes, turning frequently to prevent burning.
4. Add the eggplant, sausage, spices, and remaining olive oil to the skillet. Cook, stirring occasionally, until eggplant and sausages are warm, about 10 minutes.
5. Add in the tomatoes and cook until they are heated through.
6. Toss finished Brussels sprouts with the skillet mixture to complete the dish.

Monday, January 6, 2014

Quilling Pine Cones


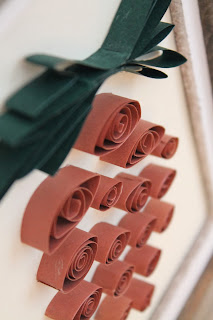
My parents recently bought a retirement home, and my mom has decided to have a pine cone theme carry throughout the home. For Christmas, I decided to make her the above wall decoration related to that theme. I had already painted pictures for her last Christmas, so I was looking for another medium to use when I noticed an artist's booth at a local winter craft fair.

The artist specialized in a traditional Chinese papercut style, with layering to create beautiful 3D works. It got me thinking about quilling, a paper-curling technique I had stumbled upon over a year ago on Pinterest but never pursued. I figured now was the time.


Searches for how others quilled pine cones came up fruitless (or didn't really showcase the quilling feature), so I came up with this design using the basic quilling shapes.


I originally envisioned the pine cone scales being closer together, but when I put it on the paper surrounded by the beautiful frame my husband found, I liked the larger separation between scales better.


My mom loved the gift, and I was super excited with how it turned out. Not sure what I'll quill next, but I thoroughly enjoyed this technique and hope to employ it again sometime soon.

Friday, June 28, 2013

Wedding Gift: Family Established Sign

Guess what I made today?


Nope, not a wood-carved eye test. It's a wedding gift for a friend! For those who've followed me on my last blog, you may remember I made these "family established" signs for some of family one Christmas based upon one we got as a wedding gift.

A good friend is getting married soon, so I decided to make one for her as well, though I took a different take on it this time.

I bought a framed board from Michael's and Dremmeled the giant E and established date portion into the wood. The wood claimed it was good for carving, but I had some issues making good lines. My bit might also be near the end of its life, but it felt more so like the wood was just harder than I expected.


I printed out my letters, but forgot to print them backwards, so as to easily rub them onto the wood. So instead I used two methods to stencil the letters onto the board: 1) newspaper between the print out and wood and then tracing the letters, and 2) rubbing the back of the paper with pencil before tracing the letters directly onto the wood.


I used this latter method when I did their name, and rather than retrace the letters afterwards to make sure I got each letter completely, I decided to go straight for the paint. I like the imperfections to the letters that resulted, and I think it gives it more character than if a machine had just cut something out of vinyl for it.


The colors are neutral so that it could go in any room of their house. I also wanted it to be fairly manly (or at least not overly feminine) so that the groom would be happy to have it around, too. (Am I the only one who thinks such things when creating wedding gifts?)


It took me less than 3 hours total, including waiting for paint to dry and touch-ups, so it's a completely easy, yet personal craft one can do for a wedding or house-warming gift.


Cooking Fun: Scones, Breads, and Macaroons


I recently began dealing with some food allergies. The good news is that my doctor believes most can be reversed. The bad news is that I have to stay away from pretty much everything for a few months while my body readjusts and can learn to distinguish food from non-food. Pretty much just certain meats and low-carb, low-glycemic veggies for me for a while.

One thing that makes this hard is that I get paid to cook. I'm not chef or anything, but part of my job involved preparing food for hundreds of folks every week. Add to that the fact that my community loves to get together and fellowship over food, and it makes it hard to stay on my limited food regiment.

Take the below items, for instance. One of my good friends is getting married, and I helped organize a surprise tea party for her. I made some cranberry scones and lemon blueberry bread-neither of which I could eat. But don't they look so tasty?

Cranberry scones recipe from Fine and Feathered

Lemon Blueberry Bread recipe from A Muse in My Kitchen
For myself for the party, I found this coconut and chia seed macaroon recipe from Meet the Shannons, and I gave it my own twists based upon my dietary needs. The first time I made it, I replaced the powdered sugar with agave nectar and used half the amount of shredded coconut. It turned out well, but slightly crumbly, like they said.

I decided to try it again, but with a few additional changes. Here's my recipe, which makes 7 macaroons. (I don't like to make large batches because that just means more being left around for me to eat.)

1/2 can coconut milk
1 Tbsp ground chia mixed with 2 Tbsp water for 5 minutes
1/2 tsp Stevia
2 Tbsp coconut flour
1 cup unsweetened finely shredded coconut flakes (I eyeball this)

Mixe the milk, chia seeds, Stevia, and flour together until well blended. Then stir in the coconut flakes. On a parchment lined baking sheet, place the loosely formed*, golf-ball sized coconut balls.

Bake in a 375 degree oven for about 25 minutes or until golden brown. Once golden, move them to a cooling rack still on the parchment paper. They will get more firm after cooling.

*I personally like tightly formed balls, but pretty much every recipe will tell you to make them loosely. Part of this reason is so that coconut flakes peak out and get toasted. But I find mine get toasted enough for me my way.


Like the original post pointed out, these are not as firm as store-bought macaroons, but this second batch actually held together better than the first. And since these are the first macaroons I actually like, I'm okay with that.


It was my first time working with Stevia, too. I've read online about others claiming a bad aftertaste with it. I didn't experience that, though maybe it's because I used such a small amount. This second batch is not as sweet as the first, but I need to be careful of my sugar/sweetness cravings anyway, so that's probably a good thing.

Now the question is, which dessert should I try next?

Friday, September 7, 2012

Red Sky At Night


When I was young, my mother gave me a starter stitchery kit. Over 20 years later, I finally finished mine. Guess she was right not to buy me another one until I finished the first.


As you can see, the copyright is for 1977. While I got it a few years after this date, it's clearly still been waiting awhile to be finished.


Thankfully, I still like the design. And given how long it's been in a bag, it definitely deserves to be on display. While tradition may dictate hiding the edges and copyright, I think the unfinished look adds to its charm.


Finishing this one actually made me desire to start another one, but given my track record on how long it takes to complete them, I think I'll stick to other forms of creativity for now.

Thursday, August 16, 2012

Something old, something new

First, for something new:


No, this isn't my way of announcing a pregnancy :) It's a card for my cousin and her soon-to-arrive second daughter. At a card making session a few weeks ago with friends, I was reminded how much fun it is to create cards rather than always buying them. So I got this idea in my head for her card, and I'm quite happy with how it turned out.

Now for something old. As I want this blog to detail items I make, I wanted to highlight some of my creations which were previously being posted on my last blog. I was quite pleased with how the below items turned out and even going back through my posts, they still make me excited to see what I created.

I'll let the pictures speak for themselves:

Fun with watercolor
Hellman's Law
Blueberry Swirl Pastries
Family Est. Signs
Wooden picture frame

Etched goblets and painted napkins
These are just a few of the things I have created since last fall, and I'm looking forward to seeing what I may be creating in the next few months!

Wednesday, July 25, 2012

New venture

I started another blog a little over a year ago, entitled "Adventures and Asides." While I still have that blog, I began to see that I had drifted off from one of the main purposes of the blog, and it seemed more like a place to share my creativity than my thoughts and adventures. So I decided I would create a new blog to highlight my creations.

"flour mill creations" is the name I have given my soon-to-be created company that markets my handmade paintings, photos, cards, signs, books, etc. Do you know what you'd name your company? Do you ever think about such things? During a card making session with some friends, I noticed one was signing the back of hers with just such a name and logo. I asked her about it and realized that others, too, have been planning such things since childhood.

As I recently got married, I rethought what my name and logo would be. Still working on the logo, but the name is a play off of my two last names. I'm quite excited about the possibilities of this venture and look forward to sharing them with you along the way.

So what are we waiting for? Let's go!