Pages

Saturday, April 26, 2014

Finding Myself in Watercolors


For the last few months, there has been a small kid's bright pink metal briefcase filled with various art supplies sitting in my work's common area. It has the usual pencils and colored pencils, but also watercolors and pastels. (When I saw the pastels, I was quickly taken back to my childhood and my oldest sister's set. I always wanted to have my own, but never did. Indeed, I had forgotten about this art medium, and it took me a few hours to remember what they were called.)

After the most recent clean-up of the common area, I noticed the briefcase was still unclaimed, so I decided to take it home, thinking I could find a kid to whom to give it. Well, after a very busy work season, I decided to take it out this past Thursday on a much-needed day of rest. I thought I would play around with each of the mediums in there, but after a short time with the pastels, I swung over to the watercolor and have not looked back.

I spent most of Thursday just enjoying how the paint glided over the paper and how it was easy to make the color intensify or dilute. I tried my hand recreating scenes from pictures. Sometimes it worked well, like with my lighthouse. But when I tried to paint the canyon lands for my husband, I found it kept looking like Mars.


When I explained this to him, he simply nodded and said I wasn't too far off base with the comparison, since sections of Utah do look like Mars. I was reminded of how I fair better painting nature scenes I know well, those that have deeply touched my being. So I may try the canyons again, but probably not for a while. 

After the below food sketches, I switched gears and did an acrylic of radishes for my farm wall. I recently added another painting of carrots to the section as well, so I'll need to show updates soon. My husband may have been joking about covering the wall with farm stand related signs and paintings, but I think it'll be a fun idea :)


I decided to get a how-to book on watercolors from the library, to help me master this craft a bit more and feel more confident in creating paintings larger than a postcard. I tend to dip my hand in lots of little things rather than becoming proficient in one area, but I'm hoping this will be one creative outlet that I can develop more. After perusing a few options, I decided to borrow "Watercolor Day By Day" by Michael Crespo. I liked the daily approach of skills to build upon as well as his more relaxed stance towards supplies a student "needs" to have to work on this craft. (Though I'm sure my kids' set is probably a bi too relaxed of a view, even for him. I'm working on that point.)

Yesterday, I was over at a friend's, who is an artist by training and trade. She let me use some of her old watercolors and scrap paper to work on the concept of value. I think that's a concept in watercolors I really like. That and negative shapes. I like how watercolor is about light: the way light plays off objects, the way it highlights certain features over others.


There is still a lot I need to learn and work on (it's only day three, after all), but I think I may have found a keeper in terms of which creative outlets I want to work on honing more. 


Railroad Wall Signs

Now that a busy season with work is done, I've been able to spend time on my creative side again. And it feels great.

My eldest nephew's birthday was earlier in April, and he loves trains. Obsessed is probably a better way to put it. Between him and my other nephew, I have learned more about trains than I ever knew existed. So when I asked for gift recommendations, my sister suggested making railroad signs to hang on his bedroom wall.


They live many states away, so I knew that whatever I made I would need to be able to ship it easily (and hopefully not too expensively). I used foam pieces for the red lights, tracing bowls to get the circular patterns.


For the crossing wood planks, I used craft wood, which is thin and light (so easy to hang and snail-mail) and can be finished like you would regular wood pieces. For shipping purposes, I cut them in half, but they easily glued back together once at their final destination. I painted each sheet white and penciled in the letters to make sure I had the spacing correct before finally painting them in black.

Lastly, I wanted to affix wire to the back of each piece so that they could be hung up easily. After measuring some scrap foam pieces I had around to fit the back of each sign, I stuck floral wire through the foam to create a loop that could easily go on a nail in the wall. I then glued the foam to the back of the signs, making an easy, yet sturdy (and still lightweight) hanging option.


The feedback was that my nephew loved it, so I'm happy with it. I hope the wall signs help foster his imagination and add to his bedroom atmosphere as a great place to be and play.

Thursday, February 20, 2014

Sausage-infused Ratatouille

As I was strolling around our local Whole Foods looking for a healthy afternoon snack yesterday, I quickly gave some thought to dinner. So far on the menu we had Brussels sprouts and sausages, and I knew that was not going to cut it. I spotted an eggplant, knowing my husband likes them, and added it to the basket, figuring I could think of specifics later.

It wasn't until I spotted a yellow onion and Roma tomatoes sitting atop my fridge that inspiration struck, and I came up with this ratatouille inspired dish.


I chopped everything up into more or less bite-sized pieces (half-inch to one inch pieces).


As I sat there chopping, thinking about the order in which to cook everything, my eyes fell on this small container of basil-infused olive oil my brother-in-law had brought back from when he was in Italy. I decided it would be the perfect thing to use for this dish.


The onion went in first, cooking for about 5 minutes. Then I added the eggplant and sausage along with some thyme, oregano, and salt. I let that cook for another 10 minutes before I added the tomatoes near the end. The Brussels sprouts had been roasting in coconut oil in the oven (my favorite method), and when they were done, I tossed it all together.


It was a flavor-filled, healthy creation perfect for a grey, soggy night here in New England.

Ingredients:
1 eggplant
1 medium yellow onion
4 Roma tomatoes
4 sausages
2 bags Brussels sprouts
4 Tbsp basil-infused olive oil, separated (use ~2 tsp basil if using regular olive oil)
3 Tbsp coconut oil
~2 tsp thyme
~2 tsp oregano
salt, to taste

Directions:
1. Spread Brussels sprouts over parchment lined sheet tray. Melt coconut oil and pour over sprouts. Put into 400 degree oven for 20 minutes. Turn sprouts around with spatula, then roast for another 20 minutes.
2. Chop up the eggplant, onion, tomatoes, and sausages into half-inch to inch thick pieces.
3. Heat a skillet over medium-high heat and add 2 Tbsp of olive oil. Add the onions and cook for about 5 minutes, turning frequently to prevent burning.
4. Add the eggplant, sausage, spices, and remaining olive oil to the skillet. Cook, stirring occasionally, until eggplant and sausages are warm, about 10 minutes.
5. Add in the tomatoes and cook until they are heated through.
6. Toss finished Brussels sprouts with the skillet mixture to complete the dish.

Monday, January 6, 2014

Quilling Pine Cones


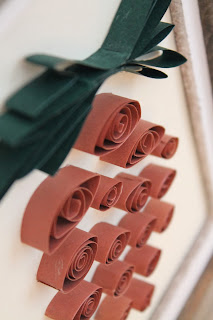
My parents recently bought a retirement home, and my mom has decided to have a pine cone theme carry throughout the home. For Christmas, I decided to make her the above wall decoration related to that theme. I had already painted pictures for her last Christmas, so I was looking for another medium to use when I noticed an artist's booth at a local winter craft fair.

The artist specialized in a traditional Chinese papercut style, with layering to create beautiful 3D works. It got me thinking about quilling, a paper-curling technique I had stumbled upon over a year ago on Pinterest but never pursued. I figured now was the time.


Searches for how others quilled pine cones came up fruitless (or didn't really showcase the quilling feature), so I came up with this design using the basic quilling shapes.


I originally envisioned the pine cone scales being closer together, but when I put it on the paper surrounded by the beautiful frame my husband found, I liked the larger separation between scales better.


My mom loved the gift, and I was super excited with how it turned out. Not sure what I'll quill next, but I thoroughly enjoyed this technique and hope to employ it again sometime soon.